This build is officially considered a bash! There are hardly any features left that makes it resemble the house pictured on the kit!! I have been having troubles over the last few days uploading pictures to my computer, so I haven’t posted anything. I feel like mini blogs just aren’t as fun when there isn’t anything to see. 🙂
So logically for me, to get the coach lamp on, I needed to have to exterior finished-ish. Since the siding and porch were scraped, I had to figure out a different way to make an entry/step to the door. I really don’t like the original porch that comes with the Orchid. Since the day I ordered it I knew that I was going to change it. So sticking with the original was never an option.
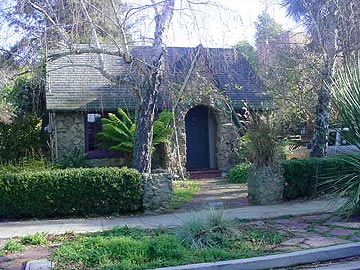
After some extensive googling of “old stone houses” and the like, I finally found inspiration here, especially this picture;
 |
|
| Source: http://www.davidskibbins.com/snapshots.html |
So I tried my best to make the orchid have a similar front entry. Here is my version;


SAY WHATTTTT??!!
That is all I have to say.
I love love love the way that this turned out. Especially how the house has that sort of grading (set backs? What do you call it? Where the wall shifts back. Lol) towards the bay window on the extension. I am sure it will look even better once it has an exterior finish too. LOL. In this picture I have only painted the base colour for my “grouting” between the stone work (that is taking me centuries to finish!!!…)
This home has not moved from the coast though. I had wondered that at one point….being stone and all. But I figure that this house is an old one…perhaps built by English/Irish settlers somewhere in the coastal region of Canada. Somewhere close to a lighthouse…because I have that lighthouse lamp and all (see lamp in this post).
Anyways. A new story is somewhat unraveling. I blame Lina and her red hair!
So stone house. I figured great way to test out this air dry clay I had. But then I forgot I had it and remembered I had stashed millions of egg cartons. Which have been known to help many in the miniature world. I followed tutorials at Otterine, The Den of Slack, and Victoria’s miniland. I kind of mixed all the (very similar advice into one). I still can’t really tell you the effect I am going for. Except that it is more neutral sandstone colors…
So far I have finished this;
 |
| With coach lights and egg carton stone! |
I’m not sure how many years weeks days this might take. And I’m not in love with the look, but I won’t stop now! Might as well play with it a bit more. I’m going to go at it with paint again because when you rip the egg cartons it is particularly difficult to rip the layers evenly (or maybe I’m just bad at ripping cartons!?). Also need to wait for some glue to dry so its easier to see where I have too big of gaps between stone. Not sure about grouting…Adgain, everyone seems to have their own way of creating their vision!
Hopefully lifting all the stones over the next week won’t take too much of a toll on my back!!I’ll keep you posted.
Becca 🙂


")

this is brilliant, I have an orchid house, how did you make the sade extension ?
Is this an orchid main house with the primrose on the side?
This is an Orchid house and the extension was build from foam core 😀
Thanks for your comment!